Per diem & travel
How Function Timetrack prices per-diem days — occupancy, high/low geography rules, opt-out caps, and travel-day proration — and how to set up per-diem city rules on a contract.
Per diem is the daily meal-and-incidentals allowance you're owed while working away from home on a tour or distant engagement. Function Timetrack prices each per-diem day for you, then lets you handle the real-world exceptions — sharing a room, opting out of housing, high-cost cities, and travel days — so the number on your settlement matches what your contract actually promises.
This article explains what the app does automatically, and walks you through the one thing you set up by hand: per-diem city rules (the high/low geography list on a contract).
Per-diem rates (the flat single- and double-occupancy dollar amounts) live on the touring level of a contract, not on the geography rules described here. City rules only change the opt-out cap. If your per-diem dollars look wrong, check the touring level first.
The Per Diem screen
Open Per Diem in the top navigation. Two sub-tabs sit underneath: Rates (the hub, below) and Zones (geographic zones, at the end of this article).
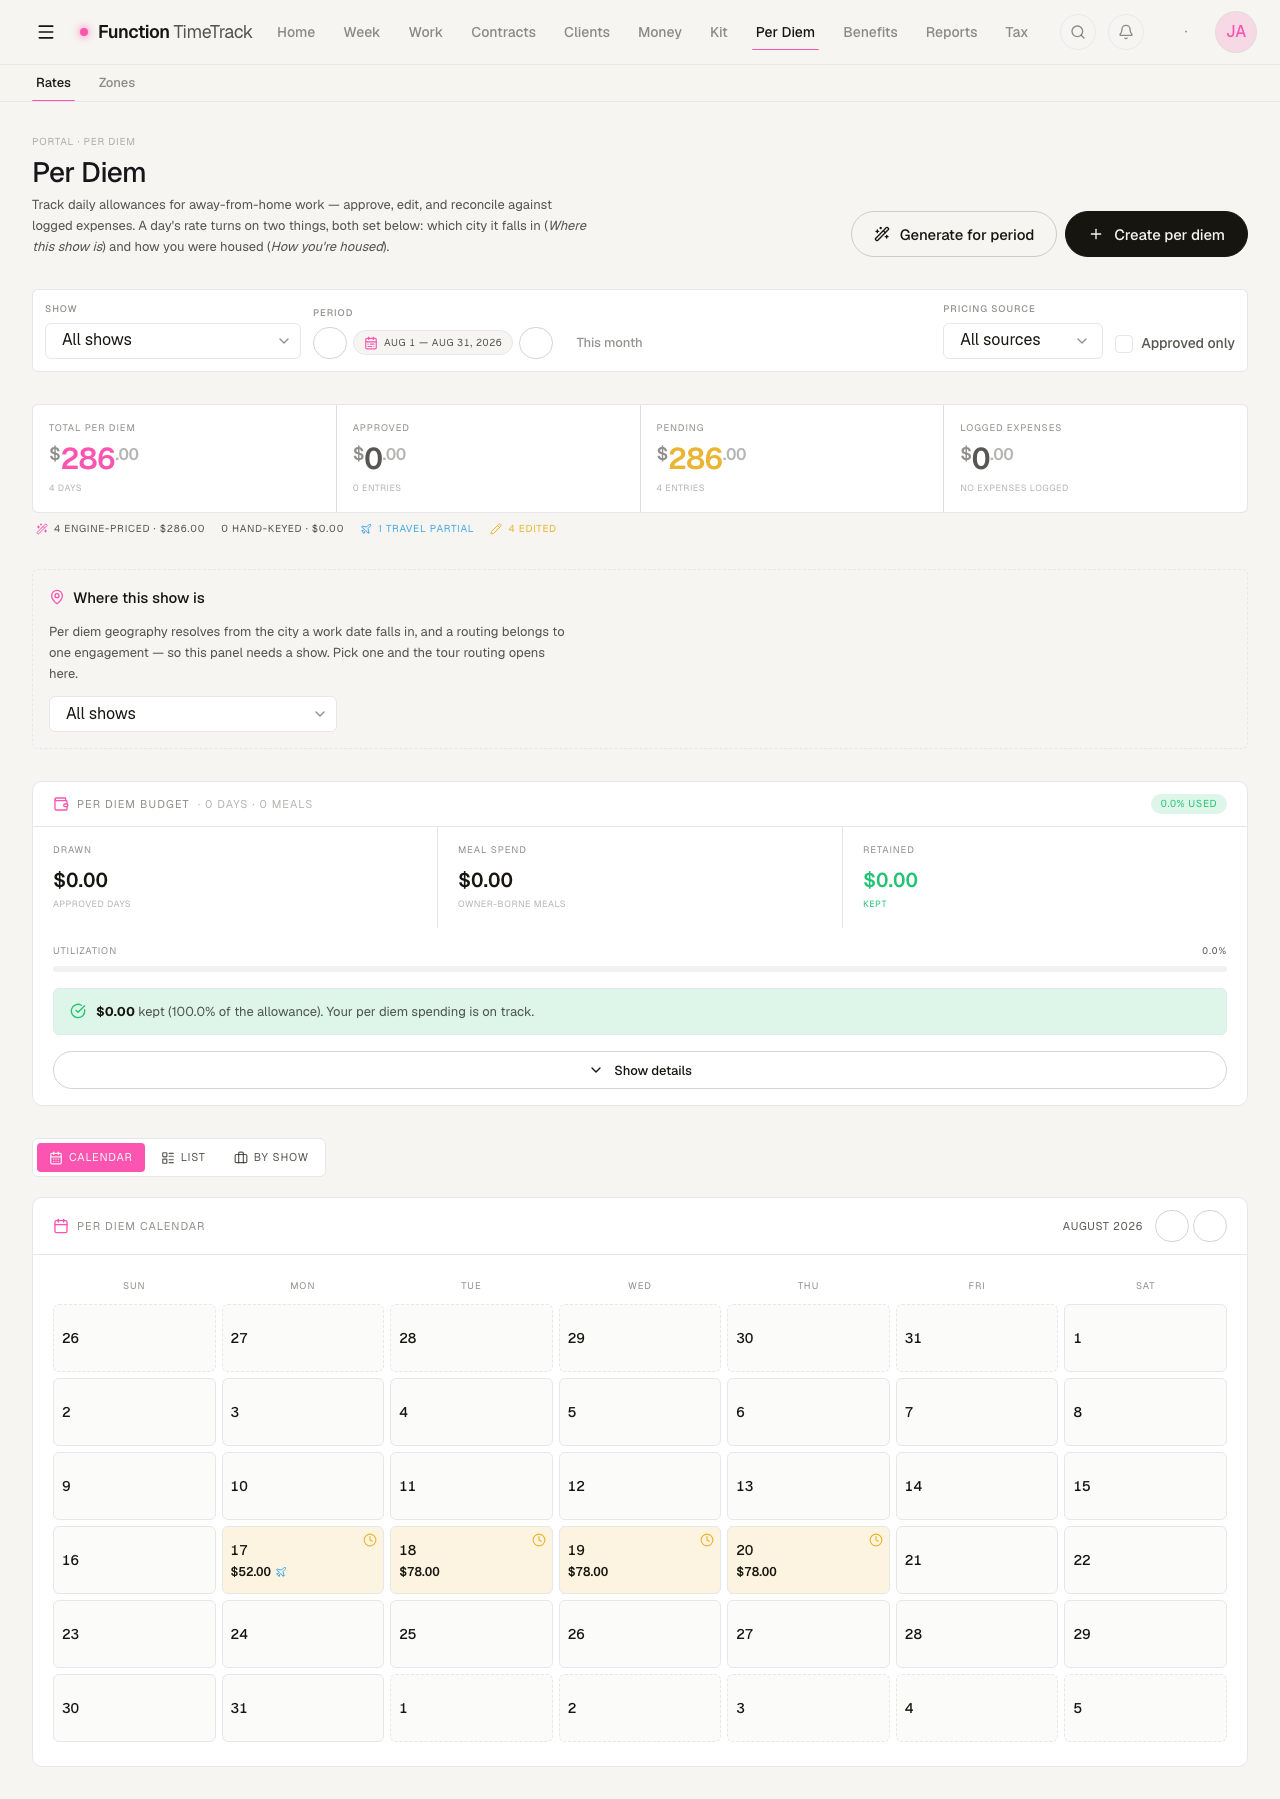
The page reads top to bottom in the order of the questions:
1. Scope
A Show picker, a Period with a stepper on either side, a Pricing source filter, and an Approved only checkbox. Everything below is scoped by this row, so it sits above everything it scopes.
The period opens on the current month and is not in the address. Unlike the Work hub, this scope lives in the page rather than the URL — so a per-diem day in another month is not missing, it is out of period. Step the period before concluding a day was never created.
2. The answers, and where they came from
Four cards — Total per diem, Approved, Pending, Logged expenses — and directly beneath them a provenance strip that is the most useful line on the page:
4 engine-priced · $286.00— days the pay engine priced from your contract.0 hand-keyed · $0.00— days somebody typed a number into.1 travel partial— days prorated as travel days rather than paid in full.4 edited— days whose amount has been changed since it was created.
That split is the point. A per-diem total is only trustworthy if you can see how much of it the app derived and how much a human asserted. Pricing source in the scope row filters the list to one or the other — and the stat band deliberately keeps reporting the whole period, saying so, rather than silently following the filter.
3. Where this show is, and how you were housed
A day's rate turns on two things and both are set here: the city the date falls in, and the occupancy you were housed at. The panel is always rendered — with no show chosen it shows an empty state carrying its own show picker, because geography resolves per engagement and a routing belongs to one show.
If any days were priced on a defaulted band — a fallback rather than a resolution — the banner above says so and how many. That count is deliberately the loudest thing in the section: a silent default on money is the failure this whole surface is shaped to avoid.
4. Per diem budget
Per diem drawn against meal spend logged, with what you retained. This is the answer to "did the allowance actually cover it", and it is the reason logging meal receipts is worth the trouble.
5. Calendar, List, By show
Three views of the same period:
- Calendar — a month grid with the amount on each day and a marker on travel partials. Click an empty day to create per diem for it; click a day with an entry to edit it.
- List — a table with approval, edit, delete and which week bills this day.
- By show — the same period grouped by engagement.
Creating days
Generate for period prices every eligible day in the current scope through the engine. Create per diem opens the bulk dialog for days you pick yourself.
Which week bills a day is its own question
A per-diem day can be attached to the timesheet week that bills it, and that is a separate axis from whether it has been paid. It gets its own control on the List view rather than another field buried in the edit form.
Zones — the other geography
There are two geographic systems in this app and they do different jobs. Do not confuse them:
| Per-diem city rules | Zones | |
|---|---|---|
| Where you set them | On a contract, in Per-diem geography | Per Diem → Zones (/zones) |
| Scope | One contract | The whole workspace |
| Attached to | A city key on a work date | A show (or a project phase) |
| What they change | The opt-out cap only | A rate multiplier and a per-diem override |
Everything earlier in this article is about the first. This section is about the second.
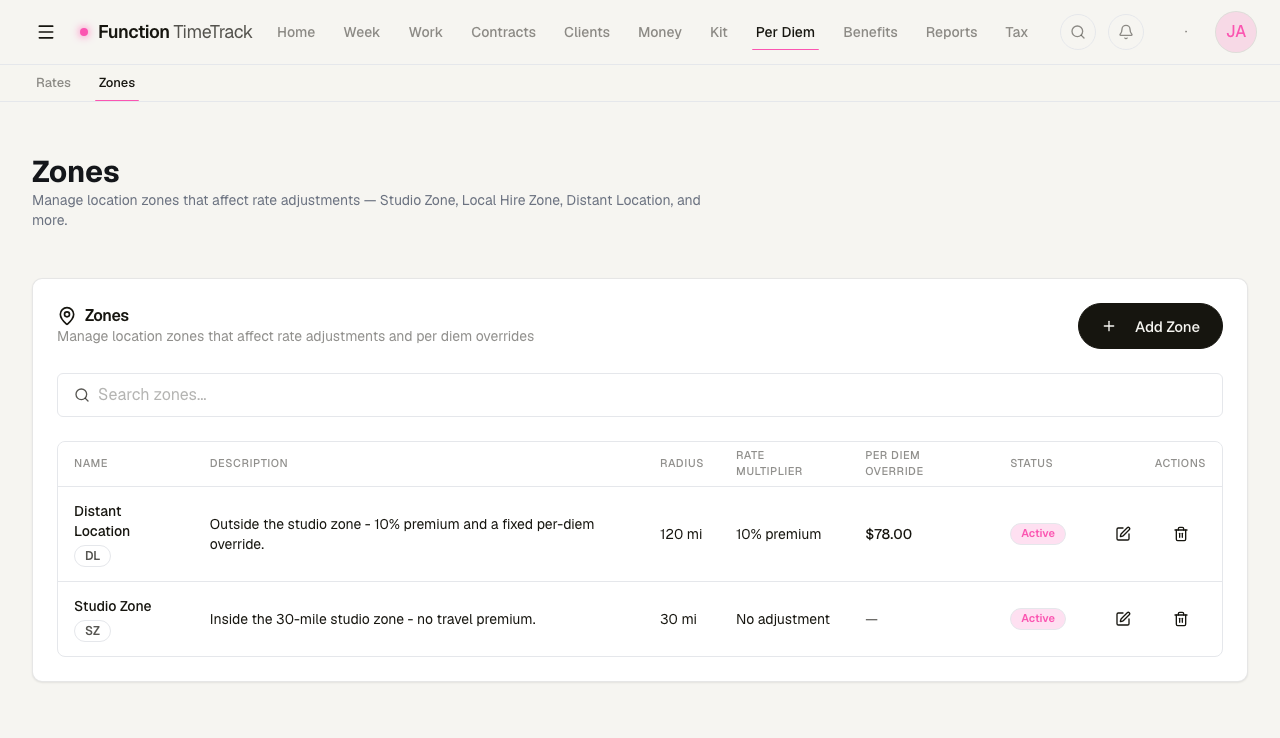
A zone is a named place-band you attach to a show: Studio Zone, Local Hire Zone, Distant Location. Add one with Add Zone, edit or delete it from the row.
The fields, and which of them do anything
| Field | Effect |
|---|---|
| Name / Code | Identity. The code is unique per workspace. |
| Description | Yours to read. |
| Rate multiplier | Real. A show in this zone has its resolved rate multiplied. 1.00 reads No adjustment; 1.10 reads 10% premium. |
| Per diem override | Real. A fixed daily amount that replaces the contract's per-diem rate for a show in this zone. |
| Radius (miles) | Recorded only. See below. |
| Mileage rate | Recorded only. See below. |
| Active | Whether the zone is offered. |
Two of these fields are stored and nothing reads them
Radius (miles) and Mileage rate are saved, displayed in this table, and consumed by no calculation anywhere in the app. There is no distance check that uses a radius, and no mileage feature that uses a per-mile rate — the mileage table exists in the database with nothing reading or writing it.
Fill them in as documentation of your own intent if that is useful. Do not expect a 30-mile radius to place a show in a zone for you, or a mileage rate to produce a travel allowance. Zone assignment is a manual choice on the show.
A zone's per-diem override and a contract's per-diem rate answer the same question, and the override wins for shows in that zone. If a show's per diem is not the figure you expect from its contract, check whether it is sitting in a zone that overrides it.
How a per-diem day is priced
For each day, the app resolves the amount in a fixed order. You don't run this yourself — it happens automatically when a day is calculated — but understanding it makes the settings below make sense.
- Level — start from the contract's flat per-diem rate (single or double occupancy).
- Occupancy — apply the elected occupancy for the day (single, double, or opted out).
- Geography — for opt-out days only, apply the high/low cap for that city.
- Travel day — if the day is a travel/close-of-tour day, prorate it instead.
- Gating — if you weren't eligible that day, the per diem is zeroed.
Nothing set up = no change. If a contract has no per-diem rate at all, the app leaves per diem to your existing source untouched. If it has a rate but no city rules, every day just uses the flat single (or double) amount. You only add complexity when your contract actually requires it.
Occupancy: single vs. double vs. opt-out
Each per-diem day carries an occupancy state that decides which branch prices it:
- Single (or unelected) — the flat single-occupancy rate. This is the default and matches the simplest case.
- Double — the flat double-occupancy rate (for example, when you share a room). If the contract has no separate double rate, it falls back to the single rate.
- Opt-out (elected or deemed) — you declined employer housing and take a cash allowance instead. The amount is your single rate plus the negotiated room rate, then clamped to the applicable opt-out cap (see below).
On an opt-out day the total can be capped. If the raw figure (single rate + negotiated room rate) is higher than the city's opt-out cap, the app pays the cap, and the day is flagged as capped so you can see the clamp happened.
Occupancy cash tiers (union tours)
Some union tours pay a different per-diem cash amount depending on how you're housed, and this is a separate dimension from the single/double room rate above. Where a day carries an occupancy cash tier, that tier's flat amount becomes the day's per diem and overrides the room-config band:
- Single — your own room.
- Shared — sharing a room.
- Distant — distant / on-the-road.
This is fully gated on the election: a day with no cash tier elected never enters this branch, whether or not tier amounts are configured on the contract.
Travel days
A travel day (close-of-tour or layoff) is prorated instead of paying a full day. The app uses a cutoff time and two factors from your contract:
- If you arrive at or before the cutoff, the smaller factor applies (for example, a third of the single rate).
- If you arrive after the cutoff, the larger factor applies (for example, two-thirds).
The proration is always taken against the single-occupancy base. If the day is marked as a travel day but no arrival time is recorded, the app uses the more conservative (earlier-arrival) factor.
Gating (eligibility)
If a day is marked ineligible — for example, a cessation stop or a pre-production day where per diem hasn't started — the per diem is zeroed for that day, regardless of occupancy or geography.
High/low geography & the opt-out cap
Per diem defaults to the Low geography band. Some cities are more expensive and your contract may allow a higher opt-out cap there. You capture those exceptions as per-diem city rules on the contract.
Geography rules narrow the opt-out cap only. They do not raise your single or double per-diem rate. A city marked High still pays the same flat single/double amount — the difference shows up only on opt-out days, where the higher cap lets more of (single + room rate) through.
A rule can promote a city in one of two ways:
- Always — the city is always High (for example, a permanently high-cost market).
- Under N weeks — the city is High only when the engagement is shorter than a set number of weeks. Longer runs fall back to Low. Use this for cities your contract treats as high-cost only on short stints.
How to add a per-diem city rule
You add city rules while editing a contract, in the Per-diem geography section.
- Open the contract you want to edit and scroll to Per-diem geography.
- Click Add city rule. A blank rule form appears.
- Fill in the fields (see the reference below).
- Click Add rule to save it. The button stays disabled until the rule has at least a City key (and a week count, if you chose the under-weeks trigger).
You must be editing a saved contract to add rules — the Add city rule button is disabled until the contract exists. If the button is greyed out, save the contract first.
City rule fields
City key — the identifier the app matches days against (for example, US-NY-NYC). Use your organization's consistent key format so the same city always matches the same rule. This is the only strictly required field.
Region (optional) — a free-text label like a metro or state, for your own reference.
Tier — High or Low. High is what promotes the city; Low is the default and generally only used to document an exception.
Trigger — Always (rule applies to every engagement) or < weeks (applies only when the run is shorter than the week count).
Trigger weeks — only shown when the trigger is < weeks. The engagement-length threshold (for example, 4). Required in that mode.
Source (catalog tag) — an optional reference tag, such as a contract clause citation (for example, [MOA §6.4]), so you can trace where the rule came from.
How to edit or remove a rule
Every saved rule shows inline, with its city key and a short summary (its tier, and whether it's always-on or gated by weeks).
- Edit — change any field directly on the rule, then click Save. The Save button only lights up once you've actually changed something and the rule is still valid.
- Remove — click the trash icon on the rule to delete it.
Removing all rules returns the contract to flat per diem. With zero city rules, every day is priced at the flat single/double rate with no geography cap adjustments. That's the correct, unchanged behavior for contracts without high-cost exceptions — but don't delete rules you still need.
Tips & gotchas
A High city doesn't mean a bigger per diem. It only widens the opt-out cap. If you expected a higher daily allowance for a High city and don't see one, that's by design — raise the single/double rate on the touring level if the rate itself should differ.
- Opt-out days are where geography matters. On single or double days, the High/Low tier changes nothing. Check that the day's occupancy is actually opt-out before troubleshooting a cap.
- Watch the "< weeks" boundary. A rule set to "under 4 weeks" applies to runs of 3 weeks but not exactly 4 or longer. Confirm the threshold matches your contract's language.
- Keep city keys consistent. Days match rules by the city key. A typo or a different key format means the rule silently won't apply and the day falls back to Low.
- Travel-day arrival time affects the payout. Arriving after the cutoff pays the larger travel-day factor. If a travel day looks low, check whether an arrival time was recorded — a missing time uses the more conservative factor.
- Use the Source tag. Recording the contract clause on each rule makes settlement disputes and reconciliation far easier to defend later.
Placeholders like $X and US-NY-NYC in this article are examples. Use the actual rates, caps, cities, and thresholds from your own contract.
How pay is calculated (gross → net)
Follow a week of work from logged hours all the way to take-home — how the engine builds your gross, and how withholding turns it into net.
Kit & equipment
Bill your own gear on a show — the equipment catalog, reusable kits, physical inventory units with serials, and the kit fees that turn all of it into money you are owed.