Logging time — the Week grid
How to log shifts, calls, meals, breaks, splits, and overnight wraps on the weekly time grid, confirm each shift, and submit the week for payroll.
The Week view is where you log what you actually worked. It shows one fiscal week (Monday–Sunday) as a grid of days, each day drawn as a 24-hour time bar. You log the raw reality — when you were called, when you wrapped, and any meal or break windows inside the day — and the app's pay engine derives the straight-time / overtime / doubletime bands and the dollars for you, live, as you edit.
The mental model
You log reality: your call, your wrap, your meals. The engine derives the pay classification (ST ×1, OT ×1.5, DT ×2, night premiums) and the money. You never type a rate multiplier — you describe what happened, and the bands appear.
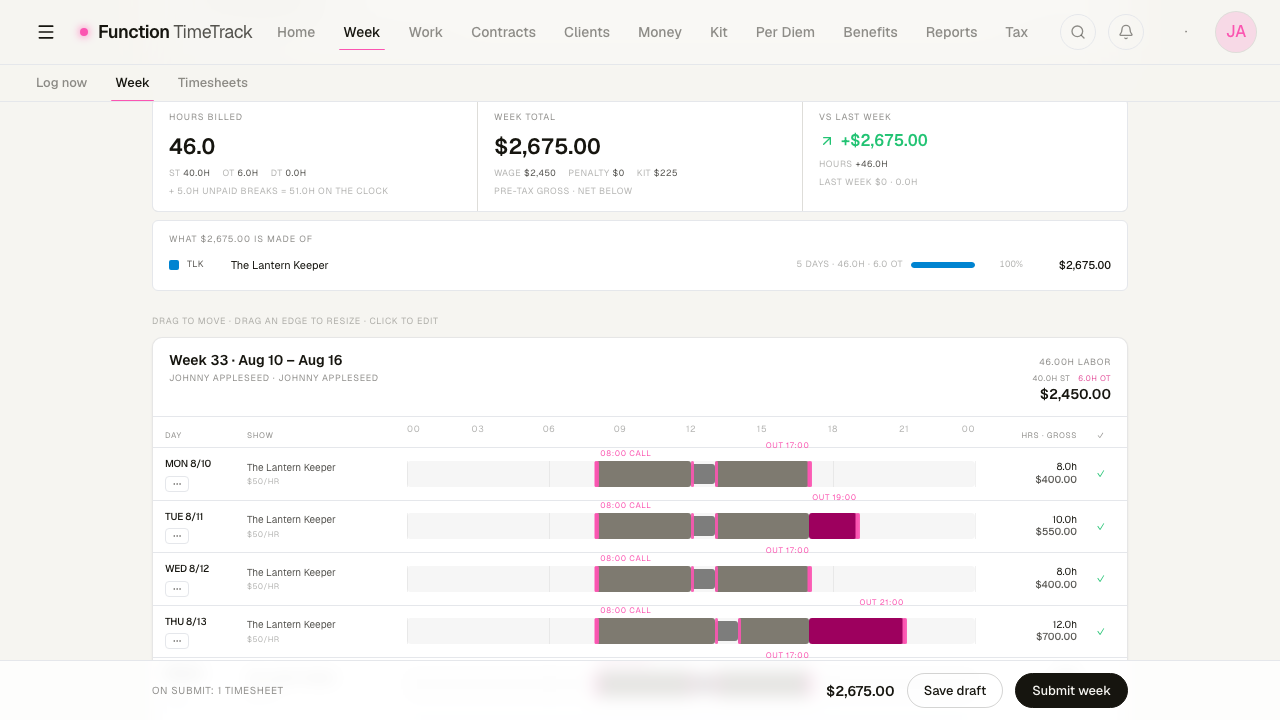
About the screenshots in this guide
Every screenshot here comes from a demo workspace belonging to a fictional Local One electrician, Johnny Appleseed, working a fictional show. The numbers are real arithmetic against a real contract — they are just not anyone's actual pay.
The layout at a glance
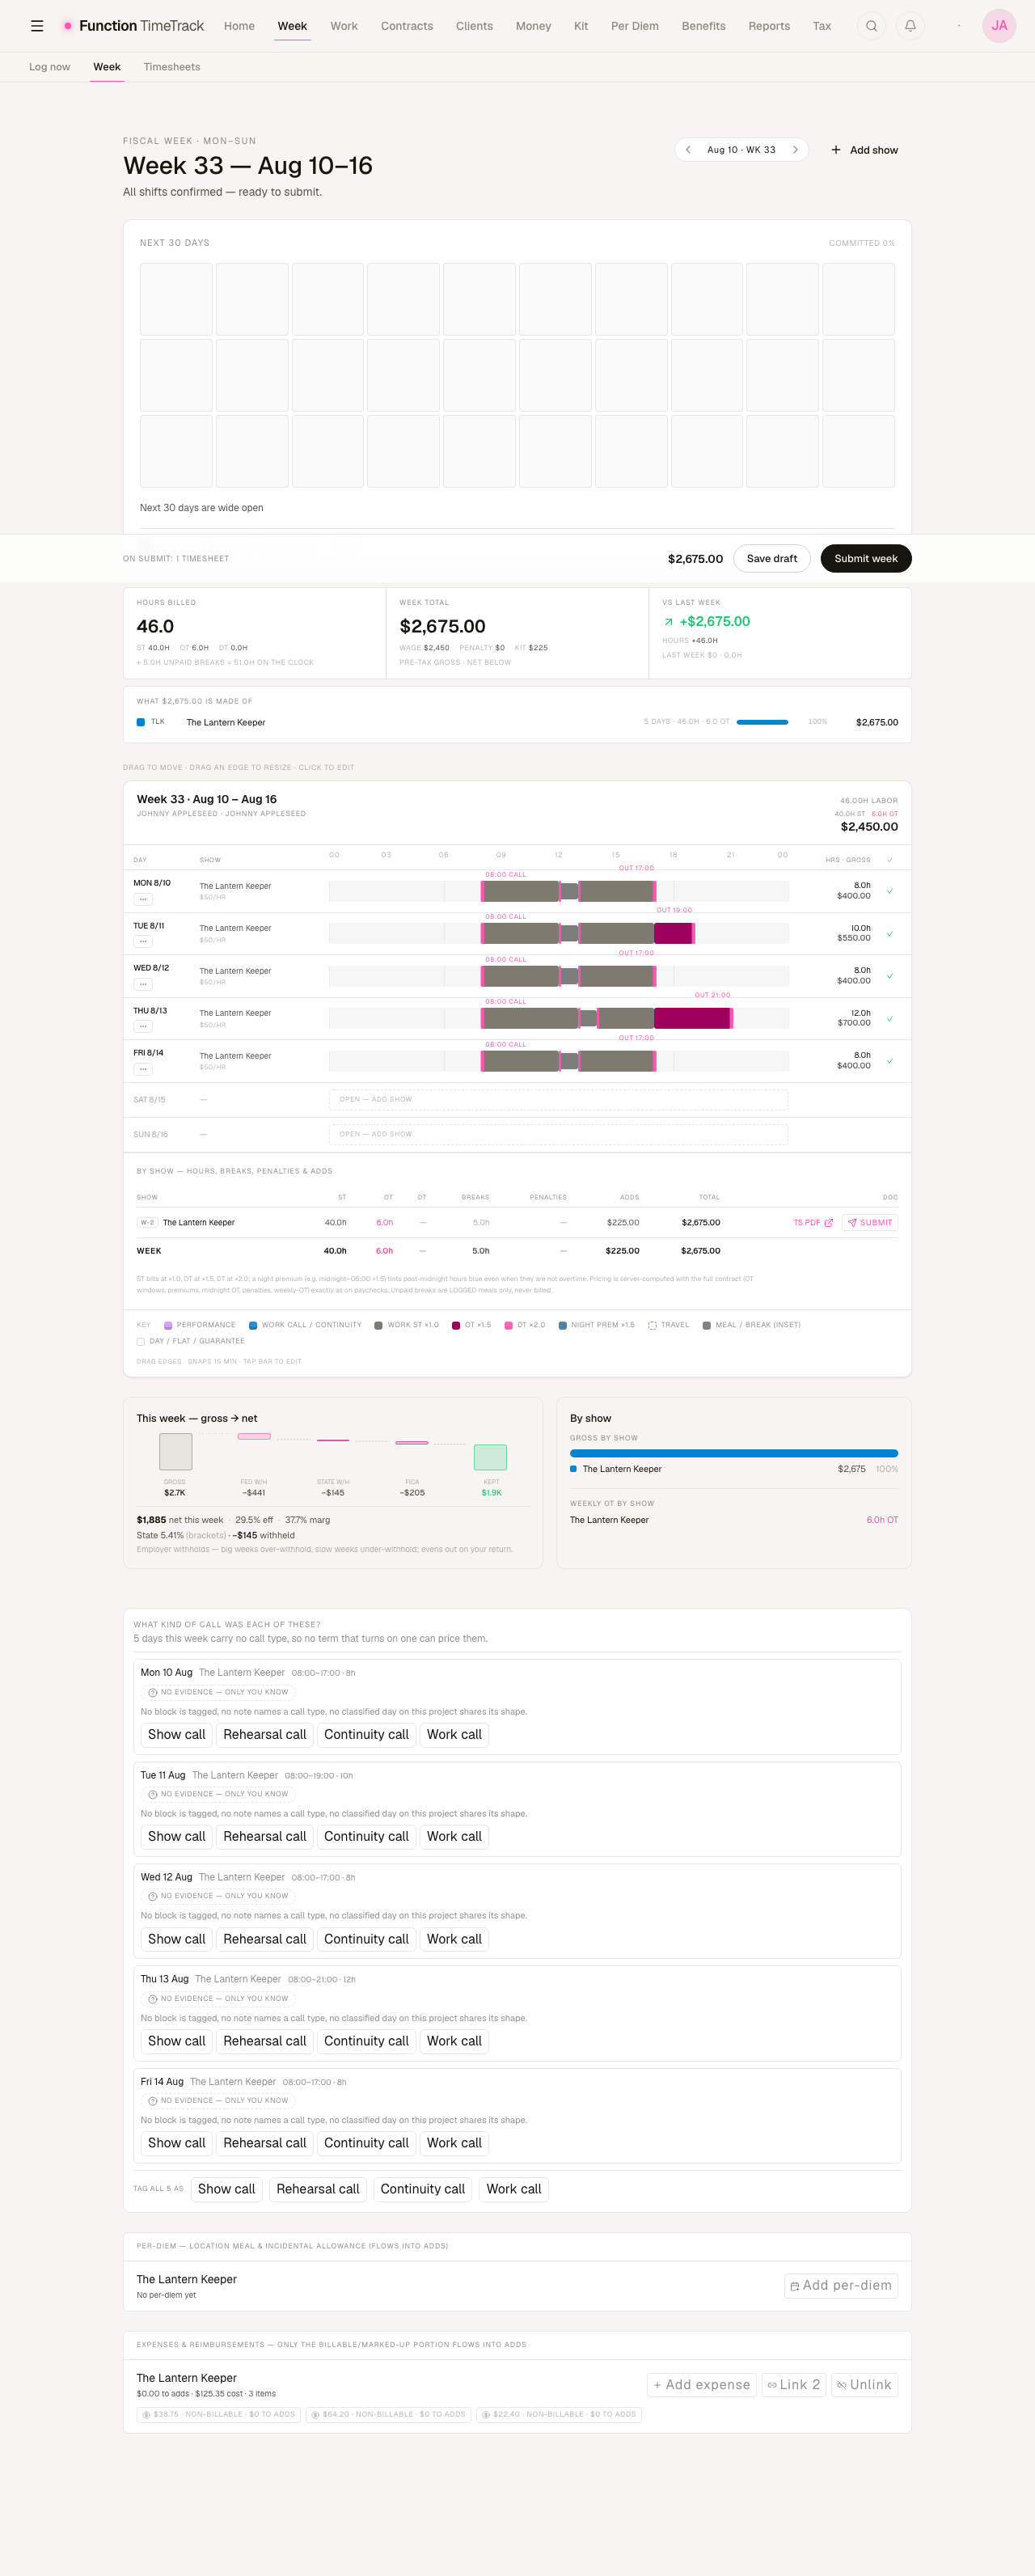
Top to bottom:
- Title band — the fiscal week ("Week 29 — Jul 14–20"), with a note telling you how many shifts are still unconfirmed.
- Week navigation — the arrows at the top right step to the previous or next week; the center button jumps back to the current week.
- Add show — the header button attaches a show to a day in this week.
- Next 30 days — a short availability strip, so a week is never read without the shape of the month around it.
- The verification band — three tiles that decompose rather than just total (below).
- The grid — the day rows themselves, under a sticky hour ruler. Columns are Day · Show · time bar · Hrs/Gross · ✓. Underneath it: a by-show readout, the penalty detail cards, and the colour key.
- Gross → net, side by side with a per-show money breakdown. These sit below the grid deliberately — the timeline leads the page, and the money roll-ups follow.
- Box-office overage, "what kind of call was this?", per diem, and expenses — each renders only when it applies to this week.
- Submit footer — a fixed bar at the bottom with the week total and the Save draft and Submit week buttons.
The verification band
The band above the grid answers is this week right, and can I submit it? Each tile breaks its headline into the parts a person actually checks a paycheck against:
- Hours billed — the headline, split into ST, OT, DT, and night premium hours. Does the ladder match your clock?
- Week total — made of what: wage, penalty, kit, and reimbursed, each named and separate, plus which shows and which days make it up.
- vs last week — the same week a week ago, so a figure has something to be large or small against.
The week is priced, never summed
The week total is the engine's own figure for the week, not the day rows added up. On a per-performance contract the engine returns $0 per day and settles at the week, so summing days would be wrong. Where the per-show rollup and the week total disagree, the difference is reported as its own labelled line rather than being quietly folded into a show's share.
Reading a day row
Each worked day draws a horizontal bar across a 24-hour track. The bands are read by colour — there is no multiplier text on the bar itself. The key at the foot of the grid names every one of them, in this order:
| Key entry | What that band is |
|---|---|
| Performance | A performance span. |
| Work call / continuity | A rate-bearing work call or continuity hours. |
| Work ST ×1.0 | Straight time. |
| OT ×1.5 | Overtime. |
| DT ×2.0 | Doubletime. |
| Night prem ×1.5 | Night premium / differential. |
| Travel | Travel time, tagged separately from work. |
| Meal / break (inset) | An unpaid window, drawn inset inside the block it carves. |
| Day / flat / guarantee | A day-rate, flat, or guaranteed block. |
The key reads straight from the same vocabulary the bars and the editor use, so bar, editor, and key can never drift apart.
The call and wrap (out) times are marked by thin accent handles with the clock time printed above the bar. To the right, each row shows the day's hours and gross; on the far right sits the ✓ confirm control.
Row states you'll see
- OPEN — a day with nothing on it yet. A dashed "OPEN — ADD SHOW" row. Tap it to attach a show for that date.
- A show with no time yet. If you add a show but haven't logged hours, the row reads "NO TIME YET — TAP TO ENTER" and prices to $0. It never blocks submit. A trash icon lets you remove it.
- Overnight continuation. A shift that runs past midnight stays one entry, but its after-midnight tail is projected onto the next day as a read-only "↳ overnight cont'd" row (more below).
- Stacked shows (a grouped day). If a day has more than one show, the rows stack under a single day label with a connecting rail down the left.
Adding a show to a day
Before you can log time on a day, a show (project) has to be attached to it.
- Tap an OPEN row (or use the Add show button in the header).
- In the picker, search for the show by name or code and select it.
- The show is attached as an empty placeholder — no time is invented. The row now reads "NO TIME YET — TAP TO ENTER."
- Tap the row to open the editor and log your call and wrap.
No shows in the list?
If you have no shows yet, the picker offers Create your first show, which takes you to the Work hub to set one up. There's also a New show… action at the bottom of the picker.
Stacking a second show on the same day
If you worked two shows in one day, add the first, then use the small + Show button under the day to stack another on the same date. The rows group together under one day label.
Paint-to-draw a first pass
On an OPEN row you can drag across the time bar to sweep out a rough time window first. When you then pick a show, the shift is seeded with that window and the editor opens so you can refine it to the minute. This is a shortcut — a tap-only add never invents any time.
Editing a day: the day editor
Tap any worked row (or the time bar) to open the day editor. It anchors just below the row and re-prices live as you type — the preview bar and the H·$ total at the bottom update on every change, before you save.
The work block (call and wrap)
A normal day is one contiguous block: your Call time and your Out (wrap) time. Enter both to the minute using the time fields.
Each block's type is its primary fact and sits full-width at the top of the row — a performance, a work call, travel, or a plain work block. Picking a type recolours the row, so what is this block is answerable at a glance. Where your contract defines differentials (construction, night, hazard), a chip row under the block lets you flag them; the flags ride onto every span the block expands to.
Overnight is normal
If your Out time is earlier than your Call time (say Call 18:00, Out 03:00), the editor marks the session +1 day automatically — it knows you wrapped after midnight. Don't try to force it to 24:00; log the real wrap time and let it wrap.
Adding a meal
A meal is an unpaid break window tagged inside the work session — it does not split your day into two shifts.
- In the editor, click Add meal. On a day with two or more blocks that button steps aside — use the meal button on the block itself instead, so the meal lands in the block you mean rather than being guessed into the first one.
- A meal appears mid-block. Set its In and Out times, or drag it.
- Change the kind to Break if it's a non-meal break.
- The live preview subtracts the unpaid window and shows the remaining paid hours.
A meal renders nested under the block it carves when the block continues through it (an intermission), and as a split when it genuinely ends one span and starts another. Remove a meal with the ✕ on its row.
Why meals matter for pay
Meal timing can trigger meal penalties on many union contracts. Logging the real meal window is what lets the engine decide whether a penalty is owed — so log it accurately rather than rounding it away.
More than one block in a day
Extra blocks are the exception, not the rule. Use them for a genuine walk-away (you left and came back), a second show, or another job the same day — not for a meal. Three controls sit under the block list:
- Add block — appends another work or travel block, pre-filled to start where the last one ended.
- Second show — the two-show shortcut: a meal at the out, then a matching span of the same identity and length, with the "two shows, not one" decision already made for you. Offered only while there is exactly one block to extend.
- Copy from… — pre-fill the whole day from a prior day's shape. Nothing is written until you save, so you can review and adjust first.
There are also day templates: apply a saved day shape as a pre-fill, or save the draft you're looking at — blocks, tags, and day flags — as a named template for next time.
Above the preview bar, a structure line states the day's composition in words —
2 blocks · 1 meal within · 2 PERF — so a span identity is never left to inference.
Tagging events
Some pay is about what happened, not how long you worked — pyro, a costume fee, an extra
performance. In the Event tags section, type the event code (for example PYRO) and click
Tag. Codes are stored in uppercase and you can add several. If your contract has a premium
configured for that code, it fires when the week is priced. (See the Event tagging guide for
detail.)
Work type
If your contract defines work types, a Work type selector appears. Pick the one that matches the call — it drives per-type minimum-call guarantees and, where the work type carries its own rate, prices those hours at it. If your contract doesn't configure work types, this selector doesn't show.
Saving
The editor footer has Delete (left), Cancel, and Save. Nothing is written until you Save; Cancel discards the draft. The live preview is a faithful pre-save picture of what the engine will price — it calls the engine, it does not approximate it.
If Save is greyed out, the reason is printed beside it in plain words — usually "Set a work session — call must be before out" or "Give the pay override a reason."
Editing directly on the bar (drag-to-edit)
You don't have to open the editor for small adjustments — you can drag on the bar itself. The footer of the grid reminds you: "Drag edges · snaps 15 min · tap bar to edit."
- Drag the body of the bar → moves the whole session, keeping its duration.
- Drag a work edge (a call or wrap handle) → resizes that session's start or end.
- Drag a meal/break edge → resizes the break window inside the day.
- A plain click (no drag) → opens the editor for that day.
Edges snap to 15-minute increments while you drag. Every session edge is grabbable — including the interior walk-away edges of a split call. Press Escape mid-drag to cancel.
Minute precision vs. 15-minute snap
Drag-to-edit snaps to 15 minutes for speed. When you need to-the-minute times, open the editor and type them in the time fields.
Overnight shifts that cross midnight
A call that runs past midnight is logged as one entry, not two. On the grid:
- The origin day shows the bar with a +1d chip, and the wrap handle reads the next-day clock (for example "OUT 03:00 +1d").
- The next day shows a read-only "↳ overnight cont'd" projection of the after-midnight tail. You can't edit or confirm that continuation row directly — edit the shift on its origin day.
If you actually started a separate new call on that next day, the empty space to the right of the continuation tail becomes an add call affordance, so the new call is logged as its own distinct entry.
Penalties and premiums
When a contract rule fires — a meal penalty, a turnaround penalty, a 6th- or 7th-day premium, a minimum-call guarantee — a small tag appears under the day showing what fired and its dollar amount. These tags are interrogable: click one to open a note explaining why it fired, straight from the engine, including the rule, the penalty hours, and the amount.
A double-billed pill appears when one wall-clock window is billed to two rates at once (shown on the bar as a soft overlap zone).
A guaranteed line names both numbers
When a contractual day minimum lifts a line, the readout says so instead of asserting hours you
never worked. A four-hour work call floored to an eight-hour category minimum reads
WORK_CALL 4H → 8H MIN — worked four, paid at the eight-hour minimum. A line with no top-up
prints its hours plain, exactly as before.
Penalty amounts come from the engine
The numbers on these tags aren't typed by hand — they're the pay engine's own output. If a penalty looks wrong, the fix is usually in the logged reality (meal timing, call/wrap) or the contract configuration, not the tag itself.
Confirming shifts and submitting the week
Each shift has to be confirmed before the week can be submitted. The ✓ at the end of a row is the control:
- Green ✓ — confirmed.
- Dashed "DR" — a day-rate shift that still needs confirming.
- Empty — nothing to confirm yet (an empty placeholder shows a trash icon instead).
Click the ✓ to toggle a shift confirmed or unconfirmed. The title band and the submit footer both count how many shifts are still unconfirmed.
To submit the week
- Log every day you worked.
- Confirm each shift (click its ✓ until it turns green).
- When the footer reads "All shifts confirmed — ready to submit," click Submit week.
Until every shift is confirmed, Submit week is disabled and the footer shows an unconfirmed warning. Use Save draft at any time to save your progress without submitting.
Unconfirmed shifts block submit
If you see "N shifts unconfirmed — blocks submit," find the rows without a green ✓ (day-rate rows show "DR") and confirm them. You can't submit past an unconfirmed shift.
Tips and gotchas
- Empty placeholder rows are fine. Adding a show without logging time is a valid way to pencil a show onto the week. It prices to $0 and never blocks submit — but it also won't pay anything until you enter hours.
- Log meals, don't skip them. An unlogged meal can hide a penalty you're owed. The engine can only judge meal rules against the real window.
- Let overnight wrap. Enter your true wrap time even if it's after midnight; the app keeps it as one shift and handles the +1d display.
- "Gross" is pre-tax. The stat band's Gross tile is your gross for the week. The estimated net shown below it is an estimate, not a take-home guarantee.
- Reimbursements aren't taxed. Per-diem, kit, and expense credits ride along in the week total but are handled separately from your taxable wages in the net estimate. Kit fees are taxable and stay inside the taxed gross.
- Vacation gross-up is named, not hidden. Where your contract pays vacation into gross, that money is a labelled part of the week's composition rather than an unexplained residual — so a week total and the lines behind it reconcile.
- Confirm is reversible. Toggling a shift confirmed and back off is safe — it just changes whether the week can be submitted.
Work Plans (planned income)
Forecast what a booking will pay before you work it — paint a span on the calendar, price it through the same pay engine as your actuals, then compare the forecast against what the show really paid.
Event tagging
How holidays are detected automatically and how to tag events like pyro or costume fees so their premiums fire.